GEOMEMBRANE LAYING AND CONSTRUCTION TECHNIQUES
Geomembrane Laying and Construction Techniques

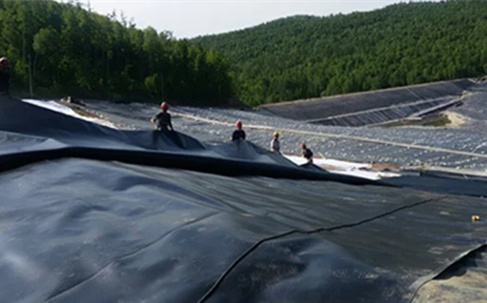
Geomembrane is a versatile material widely used in various engineering applications such as landfills, reservoirs, and mining sites due to its excellent impermeability and durability. Proper laying and construction techniques are critical to ensuring the geomembrane performs its role effectively. Whether it’s a 60 mil HDPE geomembrane for heavy-duty containment or a bitumen geomembrane for specialized applications, the installation process directly impacts the material’s long-term performance.

Why Proper Laying of Geomembrane is Crucial
Incorrect installation of a geomembrane can lead to issues such as leaks, material damage, or reduced lifespan. Proper techniques ensure:
Effective Containment: Preventing seepage of liquids or contaminants into surrounding areas.
Structural Stability: Providing a strong foundation for waste containment or water storage.
Cost Efficiency: Reducing the need for repairs or early replacements.
Step-by-Step Guide to Geomembrane Laying
1. Site Preparation
Before laying the geomembrane, prepare the site thoroughly to ensure a stable and smooth base.
Clearing and Leveling: Remove debris, vegetation, and sharp objects that could puncture the geomembrane. Level the surface to minimize wrinkles during installation.
Compaction: Compact the base to eliminate voids and provide a firm foundation. For large projects, a subgrade with proper drainage layers is essential.
For projects requiring heavy-duty liners, such as hazardous waste containment, a 60 mil HDPE geomembrane is an excellent choice due to its superior puncture resistance.
2. Material Selection
Choosing the right geomembrane depends on the project requirements and environmental conditions.
HDPE Geomembranes: High-Density Polyethylene is popular for its chemical resistance and durability. A 60 mil HDPE geomembrane is commonly used in landfills and mining operations where high strength and impermeability are critical.
Bitumen Geomembranes: These are preferred for waterproofing and road construction projects due to their flexibility and adhesion properties.
Always source materials from a trusted geomembrane supplier to ensure product quality and compliance with industry standards.
3. Unrolling and Positioning
Once the site is ready, unroll the geomembrane panels carefully to avoid damage.
Equipment: Use appropriate lifting equipment or rollers to handle large panels, especially for thicker geomembranes.
Alignment: Lay the geomembrane panels according to the project’s design plan, ensuring proper overlap between panels (typically 6-12 inches).
Minimizing Wrinkles: Stretch the panels gently to prevent folds or wrinkles, which can weaken the material over time.
4. Seaming and Welding
Seaming is a crucial step in creating a continuous, impermeable barrier. The quality of the seams directly affects the geomembrane’s performance.
Thermal Welding: This is the most common technique, using heat to bond overlapping sections. It is particularly effective for HDPE and bitumen geomembranes.
Extrusion Welding: Used for edge sealing and repairs. This technique involves applying a molten bead of material to join two panels.
Quality Checks: Perform non-destructive tests like air channel tests or vacuum box tests to ensure seam integrity.
For specialized applications, such as lining canals or reservoirs, a bitumen geomembrane offers superior flexibility and can be easily seamed even on uneven surfaces.
5. Securing the Edges
Once the geomembrane is laid and seams are welded, secure the edges to prevent displacement.
Anchor Trenches: Excavate trenches around the perimeter and bury the geomembrane edges securely.
Ballast: In windy conditions, use weights or sandbags to keep the geomembrane in place during installation.
6. Adding Protective Layers
In applications where the geomembrane is exposed to mechanical stress or UV radiation, protective layers are essential.
Geotextile Layers: Place geotextiles above or below the geomembrane to protect against punctures.
Cover Materials: Use soil, gravel, or concrete layers to shield the geomembrane from direct exposure.
Best Practices for Geomembrane Installation
1. Hire Trained Professionals:
Ensure the installation team has experience in geomembrane laying and seaming.
2. Use Suitable Tools:
Invest in high-quality welding equipment and testing tools.
3. Conduct Regular Inspections:
Check for wrinkles, punctures, or incomplete seams during and after installation.
4. Account for Temperature:
Install the geomembrane during mild weather conditions to minimize thermal expansion or contraction.
How to Choose the Right Geomembrane Supplier
Selecting a reliable geomembrane supplier is as important as the installation process. Here’s what to look for:
1.Product Variety:
The supplier should offer a wide range of products, including 60 mil HDPE geomembrane and bitumen geomembrane, to suit diverse applications.
2.Certifications:
Ensure the materials comply with industry standards such as ASTM or ISO.
3.Technical Support:
A good supplier will provide installation guidance and on-site support if needed.
4.Proven Track Record:
Look for suppliers with a history of successful projects and positive client feedback.
Conclusion
Proper laying and construction techniques are essential for maximizing the performance and lifespan of geomembrane systems. From site preparation and material selection to welding and securing, every step plays a vital role in ensuring a reliable containment solution. Invest in high-quality materials, follow best practices, and rely on experienced professionals to achieve optimal results for your geomembrane applications.


